Friday 12 March 2010


aroudn the edge of the face and the jaw line i had quite a sharp line. i was unsure why this was and by accident i moved one of the vertecies and discovered that there were two on top of each other not welded.

after welding the vertecies the jaw and face had a nice smooth curve

Wednesday 10 March 2010

intro sequence


as with my previous cloud teapot i have used the same tutorial to get the process of how to create a tunnel of clouds. Tutorial i have not followed it to the word.

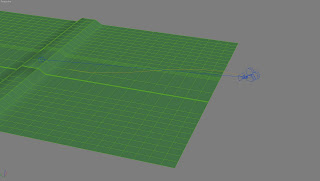
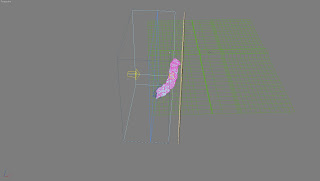
i started by creating an elongated s shape spline and a camera. i then added a path constraint to the camera so it would follow the spline. and started it at 0% on the line. i then turned on autokey. i moved to the 160th frame and set the %along the path to 90. i then assigned a path contraint to the camera target and clicked the spline. at frame 0 the % along the path was set to 10 and on the 160th frmae was set to 100% testing the animation the camera follows the path and the view is like a pilot of a plane would have when following the path.

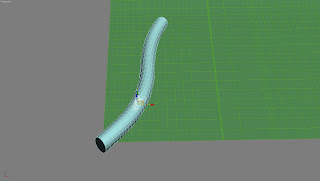
to create the clouds. i created a cylinder and aligned it to the spline. as the cylinder is like a template for the partical effect to follow. i went into object properties and deselected renderable.

i added the PathDeform (wsm) modifier and selected the path. i the changed the setting to make the cylinder stretch along the entire length of the spline.


i then added turbosmooth with 2 iteration and the noise modifier.
lastly i added the push modifier. this made the walls of the cylinder bulge in round shapes into the middle. this is now a represenation of where the clouds will be.


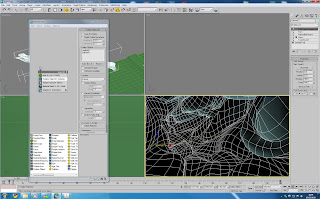
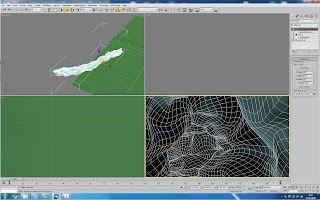
then open up the partical effects window by pressing 6. and configuesd the effect as shown in the picture. (i may need to increase the amount more as the clouds seem patchy.)


to light the clounds i have used a direct target light.
i used a render of the lights view to create a projection for the light in photoshop. to create a gradient.


this is the final result:

Tuesday 9 March 2010

head pt 1


to create the rest of the head i started by copying the edges from the jawline to create the jaw upto the neck.


i then did the same with the forehead.

making sure there was a gap for the ear to attach later.


i then copied the edges down the back of the head to complete the skull.
this was compicated as getting the curve of the head was difficult.


i joined the back of the head with the jaw by copying edges and target welding. then once i had a base for the neck i copied th boundary down to form the neck.


the last thing to complete te head is to make the ear. i hid the rest of the head and created a new plane. i then used the same method as the eye and lips to create the shape.


i then moved the verticies to the shape of the ear.


head pt 2


using the edge copying method i created the details to the ear.


i thne created the lowest part of the ear and int he front view moved the polygons towards the head.


by copying the egdes of the outer part of the ear down i was able to create the polygons that make the inner part oft he ear. and give it the proper shape.


i then comleted the outer side of the ear by creating polygons


finaly i needed to reduce the amount of edges that the ear has to connect to the head as it is easier with less.


i did this by creating polygons betweent he vertecies i already had.


i created a spline by selecting the boarder of the ear.
i hid the ear and unhid the head. using the spline i created polygons in the gap for the ear. once i had covered all the gaps u to the spline i unhid the ear to join to the head.


i attached the ear to the head object and used the target weld tool to join the vertecies to become one object.


this is the head with the mesh smooth modifier turned on.


as shown in the next 2 picture i added an adams apple to help illustrate the charater is a man.


this is the head finished i think it looks very masculine and realistic.


hercules face modifications

as the hercules character in my animation will be a face in the clouds i need to make the facial features as pronounced as possible.


i started by selecting the vertical lines on the forehead and using the connect tool to create an additional horizontal line.


I then moved this down to the eyebrows to make them more distinct. keeping the curve of the head


although the eye brow ridge had more definition from the side i didnt think it looked natural


i moved the vertexs around the top of the ridge to get the shape of the eyebrows


I think when smooted it looks more effective


lastly i exagerated the jaw line some more from the base face to make the face look stronger


this is the face completed for my hercules.

face pt4

i then copyed the bottom of the lips edges down to create the chin


i used the same method of edge moving to create the edge of the face and jaw


as the character i am modelling needs to be male i have not followed the refernce image as i think it is very femanine and have pulled the jaw line down and made it more square.


this is the same model as above with the mesh smooth modifier.


the face is almost complete after using the create polygon tool to fill in the gaps in the cheeks and forehead.


lastly i created the inside of the mouth by selecting the edges of the lips and shift moving them into the head. This will stop you being able to see the inside of the head when the mouth opens in the animation.

face pt3


i filled in the gap on the side of the nose using the create polygon tool and moulded it to the shape of the nose

i then pulled 2 polygons from the lip and welded the vertexs to each other


this then enabled me to create the nostrals of the nose
by copying edges to the middle of the nose.


i finised the nose by moving the border while holding shift to create new polygons
i created the middle of the forehead by copying the edges from the eye socket and shaping it in the right viewport to the shape of the head.


Monday 8 March 2010

face pt2


after copying the edges for a thrird time i moved the vertexs to form the eye scoket and the side of the nose.


i then copied the edges to create the nose by dragging them down


i then shaped the nose by creating more polygons and moving the vertexs into the correct place using the reference images as a guide


i continued to create polygons to form the cheeks


using the newly created polygons i was able to join the eyes, nose and mouth together.
i then used the connect tool to divide the polygon up so it could be shaped more easily

Friday 5 March 2010

face


i started the face by creating a plane and while holding shift moving an edge to create a new polygon. once the new polygon was created i switched to vertex selection and shaped the polygons to fit the lips (i am using the mirror modifier so i dont have to do both sides)


i then selected the edges and moved them to create the curve to the lips.


i then did this again to create the mouth.


i selected one of the polygons and moved it to the eye while holding shift to copy the polygon


using the same method as i did for the mouth i created the edge of the eye socket.
i will be making the eye separately so it is easier to animate.